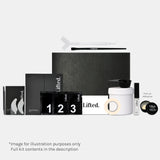


Lifted. Basics lash lifting kit contains:
- Lift, Fix and Enrich Solutions (3 sachets of each)
- Round & Flat Shields - Mix
- Lifted. Adhesive or Lifted. Adhesive Balm
- Cleansing Pads
- Double Ended Y Tool x 2
- Foam Flex Eye Pads
- Lash Lift & Tint Dish
- Long-tip Microfibre Brushes (30)
- Micropore Tape 12mm
- Lift & Tint Brush - Flat - Small
Plus Tinting adds
- RefectoCil. Lash & Brow Tints x 2 - Black & Brown
-
RefectoCil. Cream Tint Developer
Please note: Kit contents and product colours may vary depending on stock availability. Where possible, unavailable items will be substituted with a suitable alternative. In some cases, an item may be temporarily removed if no suitable replacement is available, but only where the kit continues to provide everything needed for its intended purpose.
Lash Lift Timings
Fine/Thin: 10-11 minutes for step 1 and 6-7 minutes for step 2
Normal: 12-13 minutes for step 1 and 8 minutes for step 2
Coarse/Thick: 14-15 minutes for step 1 and 9-10 minutes for step 2
Brow Lamination Timings
Fine/Thin: 6-8 minutes for step 1 and 4-5 minutes for step 2
Normal: 8-10 minutes for step 1 and 5-7 minutes for step 2
Coarse/Thick: 10-12 minutes for step 1 and 6-8 for step 2
Full guidelines are available at bottom of the page.
Lifted is our brand new and easy to use, 3 step system which can be used for lash lift and brow lamination. Our sachets can achieve up to 3 lash lifting or brow lamination treatments per sachet. Specially formulated, and exclusive to LashBase. Once opened, if sealed correctly, Lifted. sachets can be used for up to 2 weeks.
The Brow Lamination and Lash Lifting kit contains products for beauticians trained in eyelash lifting and brow lamination and are for Professional Use Only. This information is not a substitute for being professionally trained.
Here’s how the process works:
Step 1: Lift
When the lifting lotion is applied the cuticle scales swell and open, allowing the lotion to penetrate the cortex of the hair. The Disulphide bonds then break down and soften. Hydrogen from the Lift lotion continues to break down the Disulphide bonds so that it can stretch and mould into its new shape.
Step 2: Fix
When the fixing lotion is applied, a process called oxidation takes place. This reforms the broken bonds which makes the hair harden, fixing it into its new position. The new shape is formed in the Keratin. The Disulphide bonds continue to lock into place and cure for up to 48 hours post-treatment. It is important that products are not applied as this may interrupt the process.
Step 3. Enrich
This is the perfect finishing touch to ensure that the client's lashes stay healthy and strong. Enrich works by sealing the lash with Keratin and Collagen Protein and can be left on for 12 hours to ensure the lashes get the full effect
Top Tips
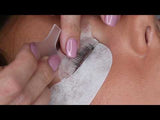
Cut your shield – Sometimes the shield can be too big for the client's eye. To resolve this, simply trim the outer edge of the shield to fit.
Shield Positioning – Before applying the lash lift shield, lightly tape down the client's lashes to the eye pad. This will give a clear view of the lash line. By doing this you can position the shield as close to the lash line as possible.
Taping the lid – Apply some de-tacked tape to the eyelid and place the shield on top. Shields adhere better to tape, meaning the shield won’t move during treatment!
Lifting the Eyelids – If you have a client with loose skin on their eyelids, then this hack is for you. Using Micropore tape, simply press one end down, close to the lash line, and pull the tape up slightly. This will help lift the lid up and increase the visibility of the lash line.
We also have a blog all about lash lifting hacks that you can find here (with demo videos too)
Lash Lift Didn’t Take?
Sometimes the client's lashes just don’t lift. This can be frustrating, however, there are several reasons a lash lift doesn’t take.
Here are a few:
- Too much adhesive
- Not cleansing properly
- Storage of solutions
- Placement
- Timings
- Shield Size
If you would like to know more about what you can do to avoid this happening, we have a blog with more details here.
Aftercare
As with any treatment, good client aftercare is vital. It’s important to make sure your clients understand the steps they need to follow to ensure their lashes stay lifted and long.
The client must keep their lashes dry for the first 24 hours, so the nourishing lotion has time to work through.
A lash lift should last up to 8 weeks depending on how the lashes are cared for. Here are a few more aftercare tips you can share with your client:
- For the first 24 hours after the lashes should be treated with care. No rubbing, pulling, or harsh products.
- For the first 24 hours after the treatment avoid getting the lashes wet, specifically no showers, hot baths, swimming, and saunas.
- We recommend using a lash serum between appointments to keep lashes in the best possible condition.
Read More
Lifted. Basics lash lifting kit contains:
- Lift, Fix and Enrich Solutions (3 sachets of each)
- Round & Flat Shields - Mix
- Lifted. Adhesive or Lifted. Adhesive Balm
- Cleansing Pads
- Double Ended Y Tool x 2
- Foam Flex Eye Pads
- Lash Lift & Tint Dish
- Long-tip Microfibre Brushes (30)
- Micropore Tape 12mm
- Lift & Tint Brush - Flat - Small
Plus Tinting adds
- RefectoCil. Lash & Brow Tints x 2 - Black & Brown
-
RefectoCil. Cream Tint Developer
Please note: Kit contents and product colours may vary depending on stock availability. Where possible, unavailable items will be substituted with a suitable alternative. In some cases, an item may be temporarily removed if no suitable replacement is available, but only where the kit continues to provide everything needed for its intended purpose.
Lash Lift Timings
Fine/Thin: 10-11 minutes for step 1 and 6-7 minutes for step 2
Normal: 12-13 minutes for step 1 and 8 minutes for step 2
Coarse/Thick: 14-15 minutes for step 1 and 9-10 minutes for step 2
Brow Lamination Timings
Fine/Thin: 6-8 minutes for step 1 and 4-5 minutes for step 2
Normal: 8-10 minutes for step 1 and 5-7 minutes for step 2
Coarse/Thick: 10-12 minutes for step 1 and 6-8 for step 2
Full guidelines are available at bottom of the page.
Lifted is our brand new and easy to use, 3 step system which can be used for lash lift and brow lamination. Our sachets can achieve up to 3 lash lifting or brow lamination treatments per sachet. Specially formulated, and exclusive to LashBase. Once opened, if sealed correctly, Lifted. sachets can be used for up to 2 weeks.
The Brow Lamination and Lash Lifting kit contains products for beauticians trained in eyelash lifting and brow lamination and are for Professional Use Only. This information is not a substitute for being professionally trained.
Here’s how the process works:
Step 1: Lift
When the lifting lotion is applied the cuticle scales swell and open, allowing the lotion to penetrate the cortex of the hair. The Disulphide bonds then break down and soften. Hydrogen from the Lift lotion continues to break down the Disulphide bonds so that it can stretch and mould into its new shape.
Step 2: Fix
When the fixing lotion is applied, a process called oxidation takes place. This reforms the broken bonds which makes the hair harden, fixing it into its new position. The new shape is formed in the Keratin. The Disulphide bonds continue to lock into place and cure for up to 48 hours post-treatment. It is important that products are not applied as this may interrupt the process.
Step 3. Enrich
This is the perfect finishing touch to ensure that the client's lashes stay healthy and strong. Enrich works by sealing the lash with Keratin and Collagen Protein and can be left on for 12 hours to ensure the lashes get the full effect
Top Tips
Cut your shield – Sometimes the shield can be too big for the client's eye. To resolve this, simply trim the outer edge of the shield to fit.
Shield Positioning – Before applying the lash lift shield, lightly tape down the client's lashes to the eye pad. This will give a clear view of the lash line. By doing this you can position the shield as close to the lash line as possible.
Taping the lid – Apply some de-tacked tape to the eyelid and place the shield on top. Shields adhere better to tape, meaning the shield won’t move during treatment!
Lifting the Eyelids – If you have a client with loose skin on their eyelids, then this hack is for you. Using Micropore tape, simply press one end down, close to the lash line, and pull the tape up slightly. This will help lift the lid up and increase the visibility of the lash line.
We also have a blog all about lash lifting hacks that you can find here (with demo videos too)
Lash Lift Didn’t Take?
Sometimes the client's lashes just don’t lift. This can be frustrating, however, there are several reasons a lash lift doesn’t take.
Here are a few:
- Too much adhesive
- Not cleansing properly
- Storage of solutions
- Placement
- Timings
- Shield Size
If you would like to know more about what you can do to avoid this happening, we have a blog with more details here.
Aftercare
As with any treatment, good client aftercare is vital. It’s important to make sure your clients understand the steps they need to follow to ensure their lashes stay lifted and long.
The client must keep their lashes dry for the first 24 hours, so the nourishing lotion has time to work through.
A lash lift should last up to 8 weeks depending on how the lashes are cared for. Here are a few more aftercare tips you can share with your client:
- For the first 24 hours after the lashes should be treated with care. No rubbing, pulling, or harsh products.
- For the first 24 hours after the treatment avoid getting the lashes wet, specifically no showers, hot baths, swimming, and saunas.
- We recommend using a lash serum between appointments to keep lashes in the best possible condition.